
HOW TO INSTALL 01-23 6.6 Duramax MODIFIED OEM Thermostats
Tools You’ll Need
-
8mm / 10mm / 13mm sockets (depending on year)
-
Ratchet and extension
-
Screwdrivers (flathead + Phillips)
-
Pliers
-
Drain pan for coolant
-
Gasket scraper / soft brush
-
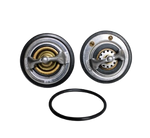
New thermostat gasket or O-ring (usually included with thermostat)
-
Torque wrench (recommended)
Optional: coolant funnel, gloves, safety glasses
Important Notes Before Starting
-
Engine must be cool to avoid burns
-
Catch all coolant — do not dump on ground
-
These modified OEM thermostats are a direct replacement; installation is nearly identical to stock units
Step-by-Step Installation
1. Drain Coolant
-
Place a drain pan under the radiator
-
Open the drain valve at the bottom of the radiator
-
Drain enough coolant so the thermostat housing can be removed without spilling
2. Locate the Thermostat Housing
-
Driver’s side of the engine
-
Follow the upper radiator hose to the thermostat housing at the intake manifold
-
On some years, there may be two housings (coolant bypass + main thermostat) — install in the main housing
3. Remove the Thermostat Housing
-
Loosen and remove the bolts holding the housing
-
Carefully separate the housing from the engine
-
Some coolant may still spill — have a rag or pan ready
4. Remove the Old Thermostat
-
Pull the old thermostat straight out
-
Note its orientation — spring side goes into the engine
-
Remove old gasket or O-ring from housing and mating surface
5. Clean Surfaces
-
Scrape off old gasket material carefully
-
Clean mating surfaces with a soft brush or rag
-
Ensure no debris falls into the coolant passages
6. Install the Modified OEM Thermostat
-
Place thermostat in housing same orientation as old unit (spring into engine)
-
Install the new gasket or O-ring included with the thermostat
7. Reinstall the Housing
-
Place housing back over the thermostat
-
Insert bolts and hand-tighten first
-
Torque to manufacturer spec (varies by year, usually ~89 in-lbs / 10 Nm)
8. Refill Coolant
-
Close the radiator drain valve
-
Refill with coolant mixture (50/50 distilled water + Dex-Cool or OEM coolant)
-
Fill slowly to avoid air pockets
9. Bleed Air From System
-
Start engine and let it reach normal operating temperature
-
Open any bleed screws if your truck has them
-
Watch for air bubbles and top off coolant as needed
10. Check for Leaks
-
Inspect thermostat housing bolts and hoses
-
Run the engine until thermostat opens (upper radiator hose will get hot)
-
Make sure no leaks are present
11. Test Drive
-
Drive the truck for 10–15 minutes
-
Ensure engine reaches normal operating temperature
-
Check for leaks one more time
Tips / Common Notes
-
Modified OEM thermostats improve flow / reliability without aftermarket adapters
-
Use new gasket every time
-
Do not reuse old thermostat
-
Keep coolant caps tight after bleeding